The “This App Can’t Open” error basically locks you out of the Windows Store, meaning that you can neither download any new apps nor update the ones that you already have, and this can be quite a boisterous problem. Fortunately, the Windows Store not opening and displaying the “This App Can’t Open” error can be fixed, and the following are the three most effective solutions that you can use to fix it:
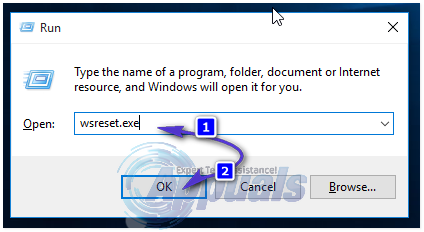
Solution 1: Reset the Windows Store’s cache
For any and all Windows 10 problems pertaining even remotely to the Windows Store, it is wise move to reset the Windows Store’s cache as your very first attempt at trying to solve the issue. To reset the Windows Store’s cache, you need to: Right-click on the Start Menu button to open the WinX Menu. Click on Command Prompt (Admin) in the WinX Menu. Type wsreset.exe into the Command Prompt and press Enter. Once this command is executed, the Windows Store’s cache will have been reset.
Solution 2: Change your computer’s DNS addresses
A DNS server is the server that translates URLs into IP addresses for your computer, and if your computer is communicating with a DNS server that no longer works, your Windows Store may not open and display the “This App Can’t Open” error every time you try to open it. Fortunately, this can be fixed by simply changing the DNS servers your computer connects to and communicates with. Right-click on the Network icon in your computer’s notification area and click on Open network and sharing center. Click on Local Area Connection. Click on Properties. Click on Internet Protocol Version 4 (TCP/IPv4) to highlight it. Click on Properties. Enable the Use the following DNS server addresses option by clicking on the checkbox beside it. If you want to use Google’s DNS servers as your new DNS servers, set 8.8.8 as your Preferred DNS server and 8.8.4.4 as your Alternate DNS server. If you want to use the DNS servers of OpenDNS – an open-source DNS service, on the other hand, set 208.67.222.222 as your Preferred DNS server and 208.67.220.220 as your Alternate DNS server. Both of these two selections are guaranteed to work. Once you are done changing your network connection’s DNS server preferences, make sure that you check the Validate settings upon exit option on your way out. Click on OK. Also click on OK in the Local Area Connection Properties Restart your computer, and when it boots up, you should be able to successfully open the Windows Store without being met with the “This app can’t open” error. You can also see steps with images for instructions on changing DNS by Clicking Here
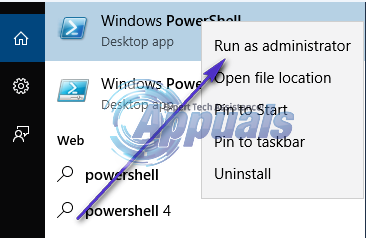
Solution 3: Re-register Windows Store through Windows PowerShell
Open the Start Menu. Type powershell into the Search bar. Right-click on the program named Windows PowerShell that appears. Click on Run as Administrator.
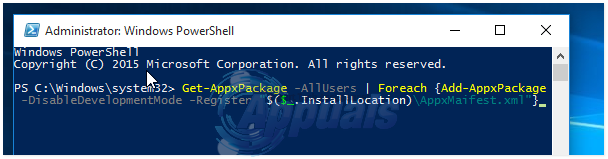
Type the following into Windows PowerShell and then press Enter: Get-AppXPackage -AllUsers | Foreach {Add-AppxPackage -DisableDevelopmentMode -Register “$($_.InstallLocation)\AppXManifest.xml”}
Once this command has been executed, your Windows Store will have been re-registered and you should now be able to open it successfully without being faced with any errors or issues.
Fix: Error 0x80073CF9 in Windows Store on Windows 10 MobileHow to Fix ‘Error: 0x803F8001’ in Windows Store on Windows 11How to Fix Windows Store Error 0x80073cf0 on Windows 8 and 10How to Fix ‘Error Checking for Updates’ Error on Google Play Store?