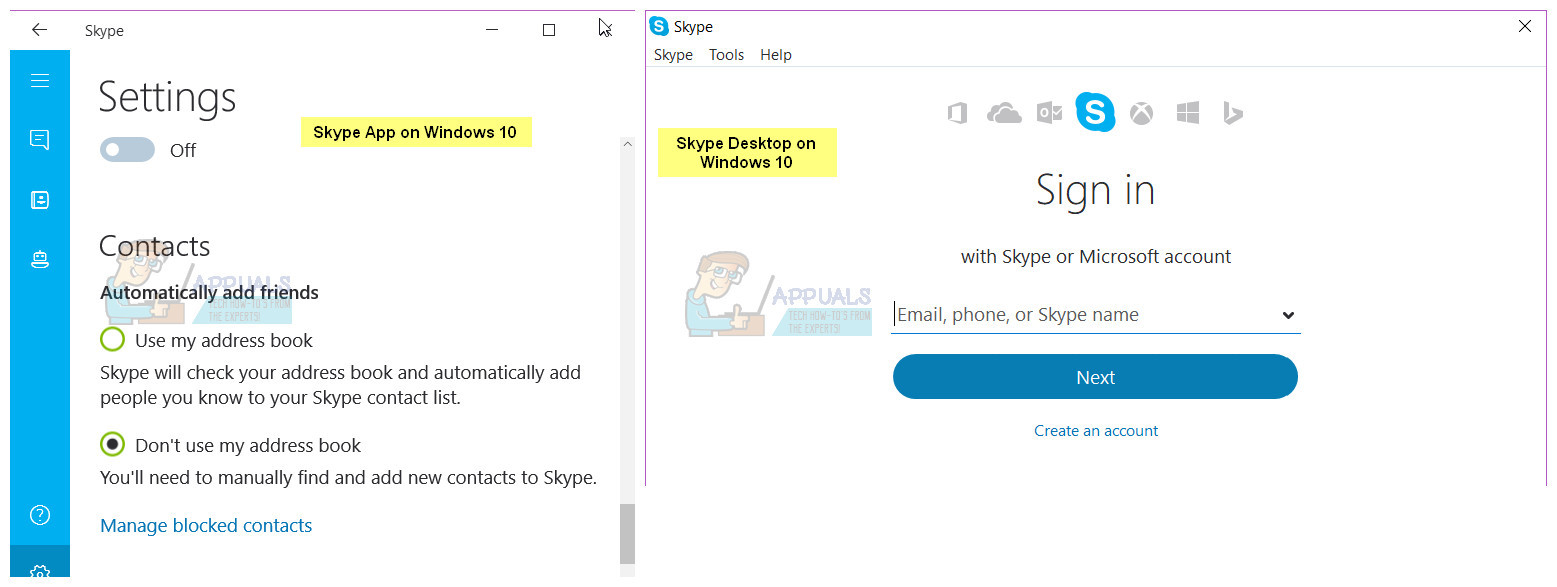
Not being able to use an application that has become extremely common all across the globe (and for good reason too) can be a pretty significant issue. Thankfully, though, it is not an unfixable issue. The following are some of the most effective solutions that any Windows 8/10 user who cannot launch or sign in to Skype can use to try and resolve the problem all on their own. A little background to this issue which is most common in Windows 8 and above is due to the built-in apps, where users are trying to run Skype from the installed app, note that there is a difference between an app and and the desktop version. Before you proceed with any of these steps, try downloading and installing the desktop version of Skype from here. This should work, but if you already have the desktop version and it is not opening then proceed with the steps below. If you don’t know whether it’s a Desktop version or a Windows app based version, then you take a look at the picture below which tells the difference.
Solution 1: Run an SFC scan
Corrupt system files can often be the reason why Windows 8/10 users cannot launch or sign in to Skype. You see, if a system file that has dealings with Skype or is needed in order for Skype to be able to function properly gets corrupted or damaged, Skype will no longer function like it is supposed to, and issues such as the application not launching or not being able to sign you in can be born. Thankfully, all versions of the Windows Operating System are equipped with the SFC scan utility – a utility specifically designed to search Windows computers for damaged or corrupt system files and either repair any that it finds or replace them with cached versions. If you can’t launch or sign in to Skype, running an SFC scan is an exceptionally good place to start trying to get rid of the problem. If you don’t know how to run an SFC scan, you can simply use this guide to run an SFC scan on a Windows 10 computer.
Solution 2: Try launching and signing in to Skype in Safe Mode
Solution 3: Disable uPnP
Skype has a feature known as uPnP that is enabled by default on all clients. Unfortunately, this feature can, in some cases, lead to the client not being able to correctly communicate with Skype servers and sign in to Skype. Thankfully, though, simply disabling uPnP in such cases is enough to get the job done and resolve the problem. To disable uPnP, you need to:
Solution 4: Uninstall and then reinstall Skype
If none of the other solutions listed and described above have worked for you, fear not as you still have one last resort – to completely uninstall Skype and then reinstall it from scratch. While it may seem extreme, uninstalling and reinstalling Skype is a surefire way of fixing most Skype-related problems. In order to uninstall and then reinstall Skype, you need to: If the issue still persists even after you’ve uninstalled Skype and then reinstalled it from scratch, simply repeat Solution 2 on your freshly installed instance of Skype and see if that helps get rid of the issue.
Fix: Can’t Create a Lock File at Library/Application Support/Skype/Skype.pidSkype for Mac Update Breaks Skype Directory Service, Here’s How You Can Fix ItFix: Skype Notifications won’t go AwayFix: We Can’t Open Skype. You Are Already Signed in on This Computer